 If your water heater or furnace is in a closet inside your home, there are a few things you can do to make it safe. It’s crazy but for decades building practices allowed furnaces and water heaters to be inside the home. Why is this crazy? Because natural gas, combustion and potentially carbon monoxide are right inside the home. In the case of furnaces with air returns below the closet, this can be a potentially dangerous situation.
The solution is to ensure your combustion appliance(s) are outside your building envelope. In most cases this doesn’t necessarily mean moving your furnace outside your house. There are a few simple things you can do to retrofit your closet to make it safe and bring it up to current building code. Here are a few simple steps for the DIY folks.
Step 1: Combustion Vents
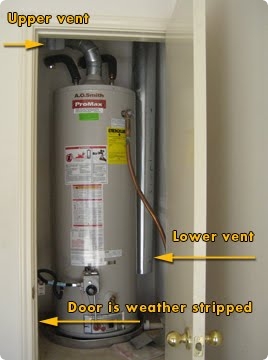
In older homes oxygen or air for combustion is often provided by vents in the closet door (see bottom of door in above photo). Since modern building codes allow combustion air to be provided by the attic, vents can be installed in the closet ceiling. These vents are pipes that drop from the attic down into the closet. One pipe is near the ceiling and one pipe drops low into the closet (see photo at left). Size of vent piping depends on several factors so it’s a good idea to consult with a specialist to determine size. The vent pipes will need to extend up into the attic at least 14 inches.
Step 2: Finish Out Ceiling
Once your combustion vents are in place you will want to finish out the ceiling. If the ceiling was completely open at the start, you may have to install drywall. Once the ceiling is enclosed you will want to insulate this area on the attic side. If you have loose fill insulation you can distribute it around the pipes and over the entire ceiling. Be sure to keep the top of the vent pipes free of insulation to allow air movement.
Step 3: Close Off Vents in Door
Once your combustion vents have been installed and the ceiling in the closet has been finished out, you will want to close off any vents in the door. You can do this by attaching a piece of plywood on the back side of the door. Be sure to caulk around the seams to make a tight seal.
Step 4: Weatherstrip the Door
The last step is weatherstripping the door. Once this door has a tight seal when latched closed, you have successfully brought your combustion appliance outside of your building envelope. Your home is now much safer.
If you are concerned about combustion inside your home you can consult with a licensed HVAC contractor or a plumber to determine the best strategy for your home.